Friday, 28 September 2012

How to make a contact sheet ! =)


  1. In order to make a contact sheet you will need to cut your roll of film (negatives) and cut them into strips of six.
  2. The check your strips on a the light-box.
  3. Insert your strips of your negatives into the negative bag.
  4. Tricky Bit ! Making a test stip before making the actual contact sheet.
  • Set the aperture to F8 on the developer machine
  • Make sure there's no filter !
  • Place photographic paper onto the bed of the developer machine glossy side up
  • Place negatives onto the photographic paper also glossy side up
  • Place a pice of glass onto the the negatives so that way they're sandwiched together
  • Exposed negatives to one second intervals in using a sheet of back paper, so that the first picture on each set would have been exposed to six seconds and the last photo on each strip would have been exposed to only one seconds.
  • Once developed you shall be able to tell how much exposure would be suitable for the whole contact sheet.
  • in my case it is between 2 and 3 seconds
Once you have decided which time was best referring to your test sheet, repeat the process again without using black paper.


And now you have a contact sheet =)!!!!


Tuesday, 25 September 2012

Reversing your pinhole photographs !


How to Reverse your pinhole photographs !


Before doing anything you need to make sure the filter on the developing machine is over the light or you'll ruin your photographic paper !

  1. Take a piece of photographic paper and place it on the bed of the developing machine glossy side up over in the light. ( filter over the light)
  2. (The light switch is the button on the left)
  3. Take you chosen photograph and place it on top of the other piece of photographic paper face down so the picture is facing the glossy side of the other piece of paper.
  4. Then place the piece of glass on top of both pieces of paper so that they are sandwiched together.
  5. Turn the light off.
  6. Mo
  7. ve the filter to the left
  8. Press the big Grey button on the bottom right.
  9. After that the light should switch off automatically so when that is done all that needs to be done now is to develop the photos in the same process you did with the other photos =)
Once your photo is fully developed your reverse should look like a normal black and white picture instead of in negative like the one above. This is where you can experiment on Photoshop. This is my before picture.

In photoshop with this photo I went to image and changed the brightness and contrast and saved it.

I then changed the hue and saturation with this one and saved it.

I then went to photo filter and enhanced it and saved it.

I enhanced the vibrance with this one and saved it.

 And finally with this one I experimented with the hue and saturation again and got a Sepia effect.


Monday, 24 September 2012

Justin Quinnell


Justin Quinnell
*

Justin Quinnell, a contemporary artist/ photographer whose interesting and obscure photos borderline the edge of surrealism, looking at the distorted aspect, has mastered the art of pinhole photography.

Justin Quinnell's photography relates to everyday life 
taking photos from different points of view. With this being said his photography has no limits, and is very expressive, from taking photos from inside the mouth, below the feet and even leaving his pinhole camera to 3 months worth of exposure in light.
In some of his work you can see the use of vignetting(the reduction of brightness and saturation at the periphery), like the one above which makes his photography look as if he is spying on someone. His photography looks like as if it's an invasion of privacy, as with the one above with the foot creeping into the picture.


In most of his photography he muted the colours and underdeveloped/overdeveloped which gave the effect that you were squinting when looking at his work. However his photos look as if you're being engulfed in his photo. As if you're actually there when he was taking the photograph.
His unique photography can evoke different emotions with the different lighting and light exposures and positioning, for example the picture above would probably evoke a lonely, miserable, depressing, sympathetic emotion. Where as the one above could evoke a more secrecy, mysterious type of feel. He uses lighting and vignetting to evoke different emotions from the audience.

To be able to create such unique and creative work on such a small scale from such a small camera is simply genius.

Thursday, 20 September 2012

Justin Quinell Mood board

From top left to bottom Right.
  1. http://techbribe.com/wp-­‐ content/uploads/2009/09/img023invertedsmall.jpg
  2. http://techbribe.com/wp-­‐ content/uploads/2009/09/img019invertedsmall.jpg
  3. http://www.lomography.com/magazine/lifestyle/2011/04/19/justin-­‐ quinnell-­‐the-­‐pinhole-­‐wizard
  4. http://www.lomography.com/magazine/lifestyle/2011/04/19/justin-­‐ quinnell-­‐the-­‐pinhole-­‐wizard
  5. http://dev.arnolfini.org.uk/whatson/event.php?id=74
6. 

Wednesday, 19 September 2012

How to make a pinhole camera =).


How to make your very own pinhole camera!


Equipment needed...

  • Sandpaper
  • Metal Ruler
  • Whiteboard marker
  • Cloth tape
  • Scalpel 
  • Paintbrush
  • Black Acrylic Paint
  • Black paper.
  • A tin/Container/Shoe box that has a secure fitting lid.
  • Photographic paper (Black and White)
  • Needle
The first thing you'd need to do is to paint the inside of your chosen container and it's lid black using acrylic paint or lining it with black sugar paper in order to prevent any reflections inside the container.


Once the paint is dry and none of the original covering of the container can be seen, measure 5cm up from the base of your tin. Mark that point and draw a 1cm square around  that point. That point you drew around will make for your pinhole.


Then using your scalpel cut a square of thick aluminum foil and pierce your needle through it in a constant backwards and forwards twisting motion. Using the sand paper, sand down the back of the aluminum so that the hole is flat and then use the black marker to cover the back.

Now with all this done you can attach the foil to the 1cm square you cut into your container using the black cloth tape. Once fully secure create a 'lens cap' to cover the pinhole so that the photographic paper doesn't become exposed to light until necessary.

LIGHT TEST!

Now it's time to test the finished product. Take half a piece of photographic paper and place it so that the glossy side of the paper is facing the pinhole and secure the lid onto the container. Take it outside and remover the lens cap. After a few seconds replace the lens cap over the hole and take to he dark room. If the paper once developed comes out fully white the the container is light proof :D.


How a pinhole camera works =).

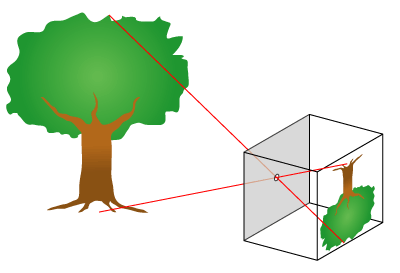
How does a pinhole camera work? It's quite simple actually. 
Light enters through the pinhole sized hole located in some thick aluminum, traveling in a straight line hits the photographic paper within the lightproof box. The image is inverted and is produced upside down on the photographic paper. Because the light is reflecting off the objects outside, the sections that come out black are those that have been exposed to light and the sections that remain white on the photographic paper haven't been exposed to the light.